jetZILLA TM quasi-monthly magazine
The family-friendly online magazine of MINIATURE JET PROPULSION!
- February 2003 - PREMIERE EDITION! -

YOU could save
a child's life! >>>

Spectacular pulsejet tail flame closeup photo (c) 2002 Pablo Becker
YOU HAVE TO START SOMEWHERE
Nice shot of tail flame of Pablo Becker's "Chinese design" pulsejet during starting -- unusually colorful exhaust! This is an excellent example of 'rich' combustion (excess fuel) often used for starting. After startup, the engine will run smoothly at a more efficient 'lean' mixture, with a fully contained flame having a thin, transparent blue appearance. Also note tailpipe temperature near the right edge of the picture. [More photos of this engine in the Feature Article, below.]

Photo Copyright 2002 Pablo Becker [ pulsejetweb ]

______________________________________________________________
 
jetZILLA   P R E M I E R E   E D I T I O N  -
______________________________________________________________

jetZILLA Online Magazine of Amateur Jet Propulsion Development
    © 2003 Cottrill Cyclodyne Corporation
       [a free subscription e-magazine]
Issue 2003-1001-0201-00                       February 01, 2003
Approx. circulation: Unknown
Publisher:  Larry Cottrill, Cottrill Cyclodyne Corporation, 
                Mingo, Iowa  USA   50168-9500
                email: jetZILLA@cottrillcyclodyne.com
[Subscribe / Unsubscribe / Change / Contact information is 
            shown at the bottom of this issue]

Our Subscriber lists are NEVER SOLD to advertisers or any
   other parties. We do not send any unrelated mailings to
   subscribers from this list. We unconditionally guarantee 
   that your name and email address are secure with us!
______________________________________________________________
 
Welcome, everyone!

I N   T H I S   I S S U E . . .
______________________________________________________________
 
1. FEATURE ARTICLE ...
   How to use a pulsejet engine to power a 
   model vehicle
   by Larry Cottrill

2. FROM THE TECH SHED ...
   Bladder Fuel Tanks for R/C Pulsejet Models 
   by Bruce Tharpe

3. FROM THE MONSTERS GALLERY ...
   The 'Cottrill LT/GT Dagger' (aircraft design) 
   by Larry Cottrill

4. PRODUCTS AND STUFF ...
   Products, links, ads, etc...

5. COMING IN THE NEXT REGULAR EDITION ...
   > From the ‘Land Down Under’: Gary Robinson’s
     Lockwood-Hiller Valveless Go-Kart Engine !
   > The “Shark”: Larry Cottrill’s new tiny Reynst-style
     valveless design, now under development and
     preliminary testing

6. ALL THAT BOILERPLATE ...
   Who we are, Subscribe, Unsubscribe, Privacy, etc...

_________________________________________________________

 F E A T U R E   A R T I C L E . . .
_________________________________________________________
Next   Contents   Top   Subscribe Now

How to use a pulsejet engine to power a model vehicle
   Copyright 2002 Larry Cottrill
_____________________________________________________

Note from the author:

A few weeks ago, a question was posted on
Kenneth Moller's website, on the Valveless Pulsejet Forum,
concerning how to use a valved or valveless pulsejet
in a radio-controlled vehicle. I posted a response that
was well-received by many participants of the forum,
since I tried to pretty well 'cover the bases' of design 
problems that might be encountered. In this Q & A article,
revised slightly from that original forum post, I'll share my 
response. This information is drawn from ongoing discussions 
and other research, as well as from my own jet modeling 
experience.

While this individual was asking about using a pulsejet 
in a model car, all of the issues I addressed in my 
answer could apply just as well to aircraft or marine 
modeling, to some extent. Since I felt from the question
that this young man had no pulsejet experience, I decided
to talk in some detail about the special design issues that 
need to be considered in using these fascinating devices.

I hope you find it informative!  - Larry Cottrill
_____________________________________________________

Q: 
> I want to build a small R/C car powered by a pulsejet. 
> I have 2 major demands: 
> 
> 1.Performance 
> 2.Reliability 
> 
> Can those two demands be met in a valveless 
> pulsejet engine design? 
>
 
A: 
I won't try to describe how to design and build an engine -- 
there are plenty of discussions on Kenneth Moller's Pulsejet 
and Valveless Pulsejet forums (and several other places) where 
these issues are discussed in detail. Instead, I'll try to 
concentrate on how to actually use such an engine to power 
a land-based vehicle.

There are many, many potential problems here -- 
so many, in fact, that you might find the situation quite 
daunting. On the other hand, maybe you are the kind of 
individual who will let nothing stop you -- in that case, go 
for it! At a MINIMUM, here are some of the design problems 
you will have to face to get the job done: 

- A lot depends on what you mean by "small": 
Lately (since Fall 2001) I've been working on what are 
considered "tiny" valveless engines, and have yet to be really 
successful at getting either reliable operation or good 
performance. My old DynaJet (a valved engine that I bought 
back in the 60s) is about 20 inches (over 500mm) long and 
exactly 2.5 inches (approximately 64 mm) maximum diameter and
weighs ONE POUND (half a KG)!. All of the few very small 
pulsejets I've ever seen photos of are about that same length, 
even if they are less than an inch (25mm) in diameter and very 
light in weight! (And, incidentally, none of these supposedly 
successful engines were valveless designs.) So, at the present 
state of the art, the "smallness" of achievable pulsejet engines 
is limited -- there are a lot of technical reasons for this, but
I won't burden you with the details here. 

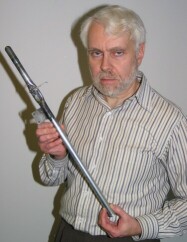
[ This photo shows me with the original Synchrodyne(TM) valveless
engine prototype -- only 3/4 inch (19 mm) in diameter, but 
around 20 inches (approx. 500 mm) long. I have only been able to
shorten this design a couple of inches so far (of course, more 
experimental work needs to be done, so it could end up a little 
more compact, eventually): ]
Larry Cottrill with Synchrodyne engine prototype - photo by Jason Wemer VIEW LARGE
IMAGE
 
Photo Copyright 2002 Larry Cottrill (photo by Jason Wemer)
- Uninterrupted fuel flow (if liquid fueled): A pulsejet of any type MUST have absolutely smooth fuel delivery -- in the case of liquid fuel, it will stop immediately if a bubble comes up the fuel line. In a pulsejet, there is simply no "flywheel" action to carry the operation of the engine through even a split-second fuel interruption. For a vehicle that runs on ground or water, this makes it VERY difficult to design and build fuel systems. Many things have been tried -- for model planes, I like to 'fill' the fuel tank with nylon scrubber material (by this, I mean the 'kitchen scrubber' kind) to baffle the slosh of the fuel. Probably the best option, though, would be a 'bladder' or 'balloon' tank, carefully purged of air when refilled. But, most balloon materials don't last long when exposed to the kinds of fuel needed (white gasoline, ether, etc.) so they need frequent replacement. [See the article by Bruce Tharpe, which follows -Ed.] 
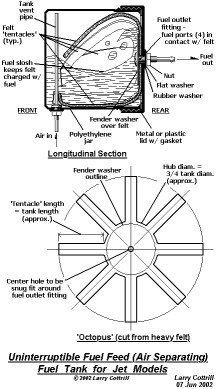
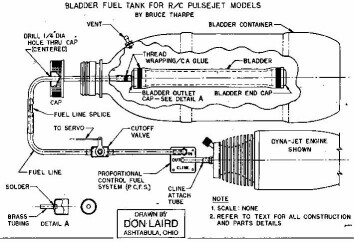
[ Here is a proposed fuel tank design based on capillary action (i.e. fuel ' wicking') -- NOTE: keep in mind that at the time of this writing (summer 2002) this is only a proposed design that has not yet been built and tested: ]
Schematic drawing of pressurized fuel system by Don Laird VIEW LARGE
IMAGE
 
- High heat output: By their very nature, pulsejets run literally red hot from the primary combustion zone near the front all the way back to the exit nozzle (I need to modify this statement a little -- once they're moving and getting plenty of airflow around them, the red hot zone is more limited, but is still a potential problem). You MUST provide (a) some sort of 'heat shield' (sheet aluminum is ideal) between the engine body and the vehicle structure, and (b) really good airflow to and around the engine itself once the vehicle is in motion. Also, you need to "get moving" right away after startup, and avoid "static running" (full power without forward motion) as much as possible.
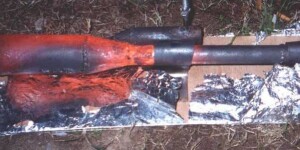
Chinese pulsejet closeup photo showing red-hot engine shell (c) 2002 Pablo Becker VIEW LARGE
IMAGE
 
THEY DO GET HOT! Closeup of Pablo Becker's homebuilt "Chinese valveless" engine running - this clearly shows the kind of operating temperatures we typically get with pulsejets. Note the dark 'cold spot' formed by the cooling action of air pulled in at high speed through the intake [the "Chinese" design is unusual, in that the air intake faces rearward - the intake and its Propane gas fuel connection can be seen at top center]. Photo Copyright 2002 Pablo Becker - Engine mounting: Because you have to insulate the vehicle body from the engine heat, mounting can be difficult. Your mounting, besides supporting the weight and inertial "maneuvering forces" of the engine, needs to be a good heat radiator, without conducting much heat to the mount points on the vehicle. Remember also that since these engines are long, you need to provide support not just for weight and thrust, but for the rotational "thrashing" forces as you corner your car. This could just be some lightweight metal bracing out near the tail end of the engine. - Poor throttleability: Generally in something like a model car, you would like to be able to slow down to a crawl when you feel like it. Pulsejets are VERY limited in their ability to be throttled, although pulsejet expert Bruce Simpson of New Zealand makes a good case for throttleability for gas-injected (as opposed to liquid-fuel carbureted) engines -- apparently, his successful propane-fueled jobs are throttleable over a fair range (I can guarantee you, the bottom end is nothing approaching the low output of a piston mill at 'idle', however). What this means is that your "slowing down" is going to be mostly a matter of good braking and ground traction, rather than the "engine braking" you're probably used to (of course, you'll want the best brakes you can put on your car, anyway). - Poor thrust/weight ratio of valveless designs: So far, it looks to me like none of us have really achieved a lightweight valveless engine that really delivers the goods, EXCEPT for the Lockwood-Hiller design in its best configuration. The L-H would be a fine engine for a car, although it's rather bulky, especially in terms of overall cross-section (however, that's probably not as critical as it is in an airplane). Note that this is an injected, not carbureted, design. Also, it is still considered experimental (in other words, not commercially available). - Starting: I have read many people saying you can light a pulsejet from the rear of the tailpipe, and in some cases I'm sure you can get away with this, but in general, spark plug ignition somewhere in the combustion zone probably provides more reliable results. I have experimented extensively with several commercial glow plugs with pulsejets and can tell you one thing they have in common: they don't work. Even using ethyl ether, I have never gotten a single bang out of one of my jets using glow plugs at their rated voltage. Spark plugs the size and thread of standard glow plugs (1/4-32) are available (Champion V-2 and V-3), though pretty expensive (around $12.00 US each), and they work beautifully, after opening the gap way up. You have to provide high voltage spark for starting (not needed after the engine is running) -- I use a Model T Ford 'buzz box' type spark coil, but much more modern solutions are available, of course. At any rate, it's quite a rig to set up. For carbureted engines, you need a supply of compressed air with steady (i.e. regulated) and easily adjustable delivery pressure, a 'push button' valve, etc., all of which is another complication and expense. For all my experimental work, I use the same pressure tank and spark coil rig I put together back in 1963 and it still does the job for all small engines. - Fuel injection: As you may have gathered, at the moment, fuel injected (and especially gas- rather than liquid-fueled) designs have some advantages. However, there are some drawbacks. Injection of liquid fuel requires a regulated pressure source such as a pump (which needs a battery in the vehicle, naturally) or a pressure tank and regulator (and if you're doing all that, you might as well use gaseous fuel like propane and just eliminate the liquid fuel). Some experts (for example, Bruce Simpson) could make a compelling argument that a fuel gas such as propane is the only reasonable way to go -- but, I don't know how small (and light weight) you can get cylinders, regulators, etc. to fit the vehicle design you may have in mind. I have always used liquid fuels in model aircraft I've designed and built for jets.
Chinese pulsejet running - wide angle photo (c) 2002 Pablo Becker VIEW LARGE
IMAGE
 
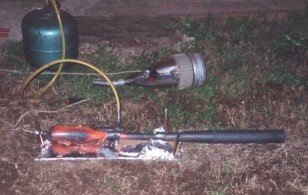
"CHINESE DESIGN" IN OPERATION Pablo's "Chinese" valveless - this is a good shot of the engine as a whole, showing the Propane tank, fuel line and connection at the intake. A properly running "Chinese" design doesn't show any flame coming out of the tailpipe - the combustion zone is entirely contained in the engine. The big 'funnel' on the ground beside the tank was used to pipe in air from a 'shop vac' for starting the engine [most pulsejet designs require forced air for starting]. Photo Copyright 2002 Pablo Becker - Fuel economy: In pulsejets, you can forget about fuel economy at the speeds at which a car can be expected to operate. They are "gas hogs" until you get up to a few hundred MPH. This is not usually a great concern to hobbyists, except that if you want to run for more than a minute or two, you're going to have to allow enough physical space in your vehicle design to house a BIG tank, whether your fuel is liquid or flammable gas. - Vibration: Pulsejets are vibration generators by their very nature, because of their multiple explosions-per-second operating mode. Make sure your radio gear is well cushioned against vibration (you'd probably be careful to do this, anyway). Back in the days of 'reed' radios (unless you're about 50 years old, you probably don't even know what I'm talking about) there would have been a concern about the jet actuating a servo by acoustic resonance, but I can't imagine the modern stuff (especially FM, 'digital', etc.) having a problem like this. The point is, just make sure nothing critical in your model vehicle is vibration-sensitive at frequencies around a few hundred hertz (cycles/second). - Safety: Because of the very high operating temperature, the flame ejection (this would be only two or three inches behind a small engine, but extremely hot and totally invisible in daylight) and the extremely volatile fuels used, safety is a big concern. Always keep a good fire extinguisher (Type A, B AND C) close at hand during starting, and always take it with you if you need to "chase down" a model that has stopped or crashed somewhere "down the road". You'll need to stay away from areas where the model might accidentally run off into dry grass, etc. - Noise: You may or may not know that pulsejets are the all-time loudest engines for their size and power ever devised by man. The reason, of course, is the multiple explosions (pulses) per second that deliver the thrust. This means that many areas you would normally use for electric or even piston-powered cars will be unacceptable for a jet-powered model. It would be nice to be able to enjoy your hobby without arrest and prosecution, paying EPA fines (US), etc. If you can handle all that (and I'm sure other jet modelers can think of a few more!) then I say, "Go for it!" Good luck -- if you go ahead with this project, be sure to write back to me with plenty of photos, and permission to publish them! - Larry Cottrill _____________________________________________________ Photo Credits: Many thanks to Pablo Becker for permission to use the fine photos of his "Chinese Valveless" pulsejet in action, as part of this article. Pablo is a student in his homeland of Argentina. You can discover more about his "Chinese" engine at his Website: pulsejetweb Pablo had this to say about his Chinese Valveless engine: Before building this engine, all my attempts to make a pjet run were unsuccessful, so I was prepared for another failure, but ... I started my vacuum cleaner and placed the nozzle about 50 cm away from the engine intake, and gradually I opened the propane valve, till it started to make some booms and then a nice roar. Once the engine was hot I started to move the nozzle towards the intake while increasing the amount of propane delivered. And suddenly, when the hose was 1 cm away from the intake, the frequency changed to about 250 hz and the roar got much louder. I couldn't believe it !! I finally had a pulsejet running. I stopped it and started jumping around the garden shouting, "It works! It works!" I wonder if Pablo had any neighbors close by who were anything near as excited as he was ;-) _____________________________________________________ Larry Cottrill is Director of Product Development and acting CEO of Cottrill Cyclodyne Corporation of Mingo, Iowa, USA - striving to create the world's smallest, safest and most practical hobby jet engines. You may contact me concerning this article at: email: jetZILLA@cottrillcyclodyne.com I reserve the right to publish any submitted question along with my response, so please indicate whether you want to be anonymous or allow me to use your name (or just first name, if you prefer) and your city/state or province, etc./country. Thanks - I'll be waiting to hear from you! Permission is hereby granted by the author and publisher to freely distribute this article, so long as you agree to use the article in its entirety, without alterations or additions, including this resource box. Do you write articles? Learn How You Can MASSIVELY BOOST Your Exposure for FREE by visiting: http://www.writers-viral-syndicator.com/Default.aspx?id=1156 The author is a member of the free Writer's Viral Syndicator and sponsored by ad-CLiX Traffic Exchange Network: http://www.ad-CLiX.com _____________________________________________________

_________________________________________________________

 F R O M   T H E   T E C H   S H E D . . .
_________________________________________________________
Next   Contents   Top   Subscribe Now
_____________________________________________________

Note from the Editor:

We're privileged to have permission from veteran flyer and
world class designer Bruce Tharpe to use his fine article on
pressurized bladder fuel tanks for pulsejet models. The
article is written with R/C flying in mind, but almost all of
it would apply to other uses of pulsejet power in model 
vehicles. When I wrote the article printed above, I didn't 
even know that there was a lightweight miniature fuel 
pressure regulator available, so this article was a real 
eye-opener!

This article is very thorough and detailed, but the system
Bruce is describing is really quite simple in principle and
easy to use once it's put together. A schematic drawing of
the system by Mr. Don Laird appears at the bottom, along 
with a full list of suppliers for the parts needed. 

It's a great tech article, and I really hope you'll find it
useful! Also, note that Bruce's Website is full of superbly 
designed model kits, plans and finished rubber bladders for 
the fuel system described below:
www.btemodels.com
 
- Larry Cottrill
_____________________________________________________


Bladder Fuel Tanks for R/C Pulsejet Models
by Bruce Tharpe
Copyright 2002 Bruce Tharpe


Over the years, my father and I have slowly been refining the 
fuel tank system for our R/C pulsejet models.  Although we’ve 
experimented with other types of bladders and pressurization 
systems, the latex bladder is our current top choice for 
simplicity, affordability, and reliability.  There’s plenty of 
room for further experimentation, but the components described 
below have been proven to work just fine.  My good friend 
Richard Caine, another experienced R/C pulsejet pilot, has some 
good advice and alternate techniques for making bladder tanks 
on his website:  
   http://Home.earthlink.net/~famcaine/pulsejets/PulseJet.htm

A quick description of the system will help you understand the 
reasoning behind the component choices.  When fueled, the bladder 
inflates like a balloon and provides fuel under pressure to a 
Cline regulator before passing through to the engine.  The beauty 
of this system is that there is no air in the tank, therefore no 
chance for an engine-stopping air bubble.  The latex is not 
compatible with gas or Coleman fuel, so we use a mixture of 80% 
methanol and 20% nitromethane.  This fuel provides a bit more 
power and keeps the reed valve cooler, at the expense of a much 
higher fuel flow.  With a methanol-based fuel, count on a fuel 
flow of about 8 ounces per minute for a Dynajet (or Dynajet 
clone).


Description of Components and Construction Techniques

1.  Bladder Material - Natural Latex Rubber Tubing, 1/2” i.d., 
    11/16” o.d., 3/32” wall thickness.  Available from 
    McMaster-Carr, order number 5234K36.  We buy this in long
    lengths, usually about 25 feet.  It’s relatively inexpensive; 
    about a dollar per foot.  It comes coiled, so most of it will 
    have a natural curve, but there will be some sections that 
    are straight or nearly straight.  I try to cut the straightest 
    bladders possible because a curved bladder may not fit well in 
    the plastic bottle container.  Cut a piece about six inches 
    long.  When fueled, this will expand into a fat sausage shape 
    approximately 3-1/2” in diameter by 12 to 14 inches long, and 
    will hold 35 to 40 ounces of fuel.

2.  Bladder End Cap - Copper 1/2” Tube Cap.  You’ll find these 
    in any big hardware store that sells plumbing supplies.  
    They are actually about 3/4” o.d. and cost pennies.  Round 
    off the edges of the caps with a wire brush to prevent 
    damage to the bladder.  Use one of these, unmodified, to cap 
    off the end of the tank.  Now comes the fun part - 
    installing the cap into the bladder.  I wish there was an 
    easier way, but I haven’t found it yet.  Force the cap into 
    the bladder, open end first.  You will have to grab the 
    rubber with your strong fingers and pull it over the cap.  
    Work your way around the bladder, tugging it a bit at a time 
    until the end cap is fully encased by the bladder material.  
    Try to make an even bulge all the way around - if the cap is 
    crooked, you will see an uneven bulge and the bladder may 
    curve like crazy when inflated.  This process might be easier 
    with some kind of lubricant, but I worry about petroleum 
    products affecting the rubber and you want a tight friction 
    fit when you’re done.
   
3.  Bladder Outlet Cap - Copper 1/2” Tube Cap with Brass Tube.  
    Make an outlet tube made from a 3/4”-long piece of 5/32” 
    brass tubing.  I’ve found that if you drill the cap with a 
    5/32” drill bit, the brass tubing will be a friction fit.  
    Tap the outlet tube into the cap so that only about 1/32” 
    of the tube extends into the cap.  Clean the area well and 
    solder the outlet tube to the cap.  This cap is a little 
    easier to install because you will have some leverage with 
    the brass tube.

4.  Fuel Line - Large Silicone Fuel Line available from many 
    sources like Sig, DuBro, Sullivan, Great Planes, etc...

5.  Heavy Thread Wrapping - I use dacron tow-line glider chord 
    available from Sig (SIGSH449, 28-lb. test, 175 ft., $2.40).  
    Any heavy thread or chord should work okay.  Wrap the end 
    caps about five or six turns and secure it with thin CA.  
    It really helps to have a second person apply the glue 
    while you’re holding the wrapping tight.  Carefully cut the 
    loose ends, obviously being careful not to nick the rubber, 
    then fully coat the wrapping with CA.  Try to be neat here 
    to keep CA from running all over the bladder.  Repeat the 
    process for the fuel line.

   
Testing the Bladder Tank

Once the bladder is at this stage, it's ready for testing.  
Blow it up using compressed air, being mindful of the 
possibility that it could pop right away.  Safety glasses are 
always a good idea. Every bladder behaves a little different 
during inflation.  Some start in the middle and grow towards 
one end, then the other.  Some start at one end and continue 
all the way to the far end.  It doesn't really matter; what 
you are looking for is a nice, straight inflated bladder.  
Sometimes straight-looking bladders will curve when inflated, 
and sometimes curved-looking bladders will inflate surprisingly 
straight. You can actually bend an inflated bladder across your 
knee to make it straighter and it will hold its new shape.  
With the fuel line pinched off, I like to let them sit 
overnight, but an hour or two is probably enough to let the 
rubber relax a bit.


The Rest of the Fuel System

Bladder Container - The bladder should be installed in the model 
housed in a clear plastic bottle.  I like the Aquafina 1.5 liter 
water bottle primarily because it has a larger-than normal cap.  
An assembled bladder won't fit through the opening in a typical 
soda pop bottle.  Drill a 1/4" hole in the cap for the fuel line 
to pass through.  You also need a vent hole in the container to 
allow air to flow in and out as the bladder changes in size.  
The vent will also serve as a drain should the bladder pop.  You 
can add a small pressure fitting (Dubro, Fox, etc...) to either 
end of the container to serve as the vent, then attach a length 
of fuel line to the fitting.  Route the line to the outside of 
the model.

Fuel Line Splice - Brass tubing, 3/16" o.d., 1-1/2" long.  This 
is needed for refueling.  The splice is somewhat oversize for 
the fuel line, but that makes for a tighter friction fit of the 
tubing.  That's good, because you don't want to bother with 
clamps at this connection, but you also don't want it to pop 
apart under pressure.

Cutoff Valve - Perry Smoke Valve, available from Tower Hobbies 
(LXDG64, $16.49).  Also listed under the Varsane name.  We have 
found that it's pretty important to have a good fuel cutoff on 
our R/C pulsejet models!  This valve is light and can be 
operated with a standard servo.  I like to use the throttle 
stick to control the cutoff.  Set up the valve so it's open at 
full throttle and closed at idle. Wrap the fuel lines at the 
attach nipples with a couple of wraps of heavy thread or 
dacron line.

Cline PCFS Proportional Control Fuel System - This little unit 
is expensive ($50.00) [now $64.50 US - Ed.], but worth every 
penny in a pulsejet model.  It's not a regulator; Cline calls it a 
"demand controller".  The controller does not allow fuel to pass 
unless the engine is running.  This is perfect because if the 
engine flames out during flight, the controller will block the 
pressurized fuel from streaming into a hot engine.  Set your 
engine up to run as it normally would under suction 
(unpressurized fuel tank), then use the same metering jet with 
the bladder and Cline controller.  For methanol, we use a 
metering jet with a .058" orifice.  

Cline Attach Tube - Large Tygon Tubing, 5/8" long.  Tygon is 
used here because it's stiff and kind of sticky.  The ideal 
position for the Cline controller is right in front of the 
Dynajet head.  The attach tube holds the controller firmly, so 
there's really no need to mount the controller to the model; 
in effect it becomes part of the engine.


Fueling the Model

The only way to fuel a pressurized "vessel" (the bladder) is to 
apply an even greater pressure to the fuel source.  We use a 
heavy plastic bottle made for garden spraying as our fuel 
supply jug.  We added a Shroeder valve to the bottle so we can 
pressurize it with the same air tank we use for engine 
starting.  It's almost mandatory to have the bladder (in its 
container) visible during the fueling process so you can watch 
that it inflates properly without kinking or bursting.  There's 
lots of pressure here so watch out for lines popping off and 
spraying around.  It's happened to us more than once.  When 
full, pinch off the fuel line going to the bladder with a 
hemostat as well as the fuel line coming from the supply jug.  
Disconnect the fuel source, then purge any air that might be in 
the bladder by letting go of the hemostat for a moment (the 
outlet cap must be facing skyward when you "burp" the bladder).  
Connect the fuel lines at the splice then remove the hemostat.  
The Cline controller will keep fuel from running into the 
engine.


Starting Procedure

The starting procedure when using a bladder tank and a Cline is 
really no different than starting with a suction-feed fuel 
system.  Hook up your buzz box, open the fuel cutoff, and start 
blasting short bursts of air into the flowjector.  Once in a 
while, especially if it's cold outside, we will use a small 
blast of starting fluid or carburetor cleaner sprayed into the 
front of the engine.  Here's one small tip:  We've found that 
these engines start easier when the spark plug is positioned 
horizontally rather than pointing straight up.


[ Schematic Drawing of the Complete System: 
Schematic drawing of pressurized fuel system by Don Laird VIEW LARGE
IMAGE
 
(Drawing courtesy Don Laird) ] Suppliers Bruce Tharpe Engineering - 8622 E Evans Creek Road, Rogue River, OR 97537 Phone: 541-582-1708. email: tharpe@cdsnet.net Assembled Bladders, Pulsejet Model Plans. www.btemodels.com McMaster Carr - Chicago, IL 630-833-0300. Natural Rubber Latex Tubing. www.mcmaster.com Sig Manufacturing - Montezuma, IA 800-247-5008. Fuel Tubing, Brass Tubing, Dacron Line. www.sigmfg.com DuBro Products - Waukonda, IL 800-848-9411. Fuel Line, Tygon Tubing, Exhaust Fittings. www.dubro.com Cline & Associates - Alpha, OH 937-426-4167. Proportional Control Fuel System. www.billsroom.com/pcfs Tower Hobbies - Champaign, IL 800-637-6050. Perry Smoke Valve, Hobby Supplies. www.towerhobbies.com Bailey Machine Service - Houston, TX 713-694-7017. Reed Valves, Metering Jets, Flowjectors. (no website) Klotz Special Formula Products, Inc. - Ft. Wayne, IN 800-242-0489. Nitromethane. www.klotzlube.com

_________________________________________________________

 F R O M   T H E   M O N S T E R S   G A L L E R Y . . .
_________________________________________________________
Next   Contents   Top   Subscribe Now
_____________________________________________________

Note from the Editor:

In this feature of each issue, we'll feature one of my own
designs from our Gallery of Hopeful Monsters. These
will generally be jet engines or related equipment that are
PROPOSED designs that are as yet untested and unproven --
BUILD AT YOUR OWN RISK !!! No full-size plans, scale prints
or detail drawings, other than what we show here, are available.
Also, since these are usually just proposed designs that we haven't
even built ourselves, we offer almost no technical information --
these are definitely for advanced experimenters who are used to 
working out the fine points on their own!

So, these designs are mostly presented to give you something to
think about, although advanced hobbyists can try to build them
and get them to run. Let us know if you have any amazing
successes to report!

This time it's not an engine, but rather a flight test aircraft
for large-scale pulsejet engines. This would probably make a
good, fast and unique U-control sport flyer for something like
a DynaJet or Tiger Jet engine, if scaled up appropriately from
the drawing presented here. Enjoy!  - Larry Cottrill
_____________________________________________________


The 'Cottrill LT/GT Dagger' Jet Flight Test Platform
by Larry Cottrill
Copyright 2003 Larry Cottrill

Basic design drawing of LT/GT Dagger aircraft (c) 2002 Larry Cottrill VIEW LARGE
IMAGE
 
Original disclosure 12/14/2002 on Kenneth Moller's Pulsejet Forum, as follows: [ Here is a proposed machine to flight test full-size pulsejet engines. The idea is that a flat deck (the top rear of the box-type fuselage) would have a large set of mounting holes distributed along the length of the reflective heat shield, so any engine design could be adapted, just by welding up suitable simple mounts to fit the nearest set of holes. The design guarantees that the blast stream is kept well clear of the horizontal control surface. Recommended construction is aircraft plywood over a welded steel tubing frame. The 'A-frame' biplane arrangement is for ruggedness, and relative immunity to rough air. Large landing flaps are required to give the ship a better power-off glide than, say, an F-104 Starfighter. Dry weight should be under 1000 lb for the size illustrated (the 'Designer' shown is NOT a six-footer). About 500 lb of fuel should be easily carried, roughly at the CG of the machine. Probably the most important design deficiency is that the ailerons can't be located very far out for snappy handling. In net terms, there is no dihedral for roll stability, so you would have to 'fly your machine' constantly [incidentally, the same was true for the Spirit of St Louis!]. ] If you want to try to turn this into a flying model, keep the following in mind: - For scaling purposes, a scale in feet (English units) and a scale in metres (International units) have now been added to the drawing - should be easier than trying to scale from the 'Designer' shown (height 5ft 4in at last measure, and not getting perceptibly taller) - The CG (balance point) of the finished model should not be allowed to get much aft of the leading edge of the upper plane (wing) -- this will undoubtedly require some nose ballast because most of the engine weight is well aft of that point - Whatever engine you use, make sure you mount it so its exhaust opening lies a little distance behind the fuselage rear bulkhead, as shown! - Larry Cottrill _____________________________________________________ PS from the Editor: One last thing -- if you DO decide to work this up into a flying model, make sure you get lots of photos and email to us in GIF or JPG format to display in a future issue [we will make the final decision as to the best ones to use, and we'll show your name as a photo credit.] And, why not try writing an article about building and flying it? We don't pay for articles, but we'd be glad to help you "get your name in print". Any author whose article we accept gets a free ad for your e-business or Web site! Naturally, we will provide editing as needed for publication in readable US English. - Larry Cottrill _____________________________________________________
"To God Alone be the Glory"
- Johann Sebastian Bach 1685 - 1750

_________________________________________________________
 
P R O D U C T S   A N D   S T U F F  . . .
_________________________________________________________
Next   Contents   Top   Subscribe Now

__________________________________________
 
V i s i t   O u r   F r i e n d s  . . .
__________________________________________

   Bruce Tharpe Engineering - 8622 E Evans Creek Road, 
      Rogue River, OR 97537  Phone: 541-582-1708. 
      Assembled fuel bladders, pulsejet model plans and 
      MUCH more.   email: tharpe@cdsnet.net
      Site: www.btemodels.com    

   ModelFlight - United Kingdom 
      A top-notch magazine for model flyers -- check out 
      the 'Gallery' section for photos of some absolutely 
      beautiful aeromodeling work from all over. Lots of 
      scale stuff. Good construction hints, reviews, etc. 
      All kinds of aeromodeling represented, including the 
      occasional jet craft. www.modelflight.fsnet.co.uk    

____________________________________________
 
V i s i t   O u r   O w n   L i n k s  . . .
____________________________________________

   Tools for Marketers / Webmasters [ TfMW ] -
     Page 2 [ complete product catalog ] - 
      www.cottrillcyclodyne.com/NetProd_page2.html    

   Cottrill Cyclodyne SFOATM Pulsejet Engine Design / 
      Development Page - where "Steel Floats On Air"!
      www.cottrillcyclodyne.com/SFOA1.html    

   Cottrill Cyclodyne Corporation Site Directory - 
      www.cottrillcyclodyne.com/Page_9999.html    

   jetZILLA Initial Press Release [ return to the 
      jetZILLA home page, then select from 'Archived 
      Editions' ] - 
      www.jetzilla.com    

_____________________________________________________
 
M a k i n g   M o n e y   o n   t h e   'N e t  . . .
_____________________________________________________

   Push Button Publishing - 
      Bryan Winters promises: "Not Only Will I Show You
      How to Make Your Living Online, I'll Also Pay For
      the Products, Services, and Resources Needed to 
      do it: Web hosting, Autoresponders, Ad Tracking, 
      and More!" Click here for the solution you've been 
      searching for: www.pushbuttonpublishing.com    

_________________________________________________________
 
C O M I N G   I N   T H E   N E X T   E D I T I O N . . .
_________________________________________________________
Next   Contents   Top   Subscribe Now

   > From the ‘Land Down Under’: Gary Robinson’s
     Lockwood-Hiller Valveless Go-Kart Engine !

   > The “Shark”: Larry Cottrill’s new tiny Reynst-style
     valveless design, now under development and
     preliminary testing
_________________________________________________________
 
A L L   T H A T   B O I L E R P L A T E . . .
_________________________________________________________
Contents   Top   Subscribe Now
____________________________________
 
T h e   W e b   E d i t i o n  . . .
____________________________________
 
If you're reading the email version of this newsletter, 
you may find the Web version much more enjoyable. It is 
prettier, and you don't have to click on the pictures to 
view them! Go to 

http://www.jetZilla.com/jetZilla.html Eventually, we will also provide a link for Web pages archiving past issues. _________________________________________________________ D o n ' t T r y ' R e p l y ' . . . (email version) _________________________________________________________ Like virtually all newsletters/ezines on the 'net today, jetZILLA is mailed via an autoresponder - using your 'Reply' button will just result in 'bounced' (nondeliverable) email. Please use the Subscribe / Unsubscribe / Change / Contact information detailed below. _______________________________________________ W h o I n t h e W o r l d A r e W e ? _______________________________________________
  Larry Cottrill with Reynstodyne(TM) Shark(TM) engine prototype after early test firing - Photo Copyright 2003 Cottrill Cyclodyne Corporation
  Larry Cottrill with ReynstodyneTM SharkTM engine prototype after early test firing
Photo Copyright 2003 Cottrill Cyclodyne Corporation
My name is Larry Cottrill. I'm Director of Product Development and Acting CEO of Cottrill Cyclodyne Corporation, registered as a for-profit corporation in the State of Iowa, USA. We are striving to create the world's smallest, safest and most practical hobby jet engines. We also have an intense interest in Internet- and Web-based marketing [since our future products will be promoted and marketed extensively online] and offer top-quality, low-cost and no-cost resources to help make the jobs of marketers and webmasters easier, more cost-effective and more productive. ________________________________ T h i s N e w s l e t t e r a n d Y o u (email version) ________________________________ You are receiving this free issue because of one of the following: -You specifically elected to subscribe from one of our Web pages -I know you personally and thought you'd like it -I asked you if I could send it and you agreed to try it -Online, you recently expressed interest in receiving information related to miniature jet propulsion systems -Someone you know forwarded it to you because they believed you'd enjoy it or benefit from it [see subscription instructions below]. If you don't want to receive future issues, scroll to the bottom for unsubscribe instructions. You are free to unsubscribe at any time in the future, of course. Our goal is a monthly newsletter that will: -help you enjoy the miniature jet engine hobby -share articles and other resources of interest -be easy to read and truly informative -answer specific questions asked by our readers Your email address is the ENTIRE CONTENT of our database listing for you. NO FURTHER DATA IS ON FILE, AND YOUR SUBSCRIBER INFORMATION IS NEVER SHARED IN ANY MANNER FOR ANY PURPOSE. PERIOD. All related mailings from us will ALWAYS be clearly identified with the jetZILLA brand name/trademark. _______________________________________________ F r e q u e n c y o f P u b l i c a t i o n _______________________________________________ Our newsletter is sent/updated approximately once per month, except for RARE instances of non-commercial 'public service' information that we feel is of an urgent nature warranting a 'Special Edition'. ___________________________________________ C o m m e n t s a n d Q u e s t i o n s ___________________________________________ Comments, reader questions and suggestions are always welcome! You are free to contact us at any time: email: Comments@jetzilla.com We will do our best to respond within 48 hours, at most. We reserve the right to publish questions and answers if we think they would be of interest to other readers - if you don't want your name published, please type 'Withhold Name' at the top of your question. We will NEVER publish your email address, unless you include it yourself in a BRIEF 'signature' block beneath your name at the bottom of your email text. ________________________________________________ H o w t o S u b s c r i b e (email version) ________________________________________________ Just use this link for your subscribe request: Send BLANK email to: jetZILLA-subscribe@topica.com You do not need to fill in the Subject line or include any text. Be sure you do this from the email account where you want To receive each email issue of jetZILLA ezine. ________________________________________________ H o w to C h a n g e Y o u r S u b s c r i b e r D a t a (email version) ________________________________________________ It's easy to change your subscription data - just use the following procedure: A. Unsubscribe, using the link at the BOTTOM of this email. B. Go to the email account where you want to receive jetZILLA ezine, and use the ‘Subscribe’ mailto link (same as above): email: jetZILLA-subscribe@topica.com It is not necessary to include text in the body or Subject. ____________________________________________________ H o w t o U n s u b s c r i b e (email version) ____________________________________________________ We're sorry to see you go! But, we realize that people's needs change, and not every publication can be beneficial to every possible subscriber. We hope you've enjoyed being with us and that you've benefited in some way by receiving jetZILLA ezine. Just click on the Unsubscribe link at the bottom of this email. You should receive an acknowledgement email very soon thereafter. Thank you! - Larry Cottrill, publisher jetZILLA ezine

Page updated: 19 May 2003

Copyright 2003 Cottrill Cyclodyne Corporation
- All rights reserved -